E5 | Carolina Comeback | Out of the Mountains
Season 47 Episode 5 | 23m 42sVideo has Closed Captions
Kevin lends a hand in Asheville as the builders install kitchen cabinets.
In Swannanoa NC, Kevin O'Connor joins builders Chris and Noah at homeowner Miah's house to help install kitchen cabinets. In North Asheville, Jenn Nawada learns of FEMA's tree removal efforts after Hurricane Helene. Mark McCullough tours the amazing masonry work of The Grove Park Inn, while Richard Trethewey teams with Abe and Caleb to air-seal Paula's home.
Problems playing video? | Closed Captioning Feedback
Problems playing video? | Closed Captioning Feedback
Funding for THIS OLD HOUSE is provided by The Home Depot and Renewal By Andersen.
Support provided by:

E5 | Carolina Comeback | Out of the Mountains
Season 47 Episode 5 | 23m 42sVideo has Closed Captions
In Swannanoa NC, Kevin O'Connor joins builders Chris and Noah at homeowner Miah's house to help install kitchen cabinets. In North Asheville, Jenn Nawada learns of FEMA's tree removal efforts after Hurricane Helene. Mark McCullough tours the amazing masonry work of The Grove Park Inn, while Richard Trethewey teams with Abe and Caleb to air-seal Paula's home.
Problems playing video? | Closed Captioning Feedback
How to Watch This Old House
This Old House is available to stream on pbs.org and the free PBS App, available on iPhone, Apple TV, Android TV, Android smartphones, Amazon Fire TV, Amazon Fire Tablet, Roku, Samsung Smart TV, and Vizio.
Keep Exploring


This Old House Insider Newsletter
Get This Old House exclusive stories, tips, and behind-the-scenes information delivered right to your inbox every month.Providing Support for PBS.org
Learn Moreabout PBS online sponsorshipKevin: Today on "This Old House"... Richard: We'll show you a system that can make airtight any building, whether new or existing.
Mark: And in my world, this is a masonry project extraordinaire.
I'm going in.
I want to see the mechanics.
Jenn: And you determine what's unsafe, what's going to go down in the next storm, and then remove them.
-Matt: Yep.
♪ ♪ Man: Ahh.
That's it.
♪ ♪ ♪ ♪ Kevin: Hey, there.
I'm Kevin O'Connor, and welcome back to "This Old House."
How about that, huh?
I mean, lots to love about western North Carolina.
Richard: What is that I hear?
it sounds like every tree has got a speaker in it.
Kevin: No, no, those are actually the cicadas.
-Richard: Cicadas?
-Kevin: Oh, yeah, a billion strong.
So a lot of them are underground for 17 years, and then they pop up and they start making a racket because they're all trying to find a mate.
Richard: So it's sort of like the world's largest and loudest blind date for bugs.
Kevin: That or a really nice soundtrack for a ride on the Blue Ridge Parkway.
-Richard: It really is.
I mean, the views go on forever here.
Kevin: Oh, yeah.
Let's go for a ride.
Yeah, you're not kidding about the view.
Richard: It's unreal.
Kevin: I mean, and the highway runs almost 400 miles all the way from Virginia out to the Great Smoky Mountains.
Richard: And this was done during the Great Depression as part of that New Deal, and the New Deal were all these great public works projects.
And this was designed to showcase really some of the most beautiful scenery in this country.
Kevin: And it's probably the most peaceful highway I've ever been on.
Richard: Unless, of course, you're a cicada.
Kevin: True.
Unless you are a cicada.
Well, peaceful for sure, but this highway was not very serene last fall.
So Hurricane Helene damaged a lot of homes, a lot of businesses.
But it also brought trees down that blocked large swaths of the highway.
Richard: Well, I read about it, and I actually saw it.
And there were so many trees that were down, and it looks like they've cleaned up a fair amount of it here on the parkway.
Kevin: Oh, yeah.
It looks pretty good.
I mean, I think there's still a couple spots here and there, but otherwise good progress.
Speaking of progress, how about the progress down at our project houses?
Richard: Yeah, Kevin, I got to hand it to these builders.
You know, they were up to their eyeballs with plenty of business before the storm came.
And they have stepped up, they and their subs, in a great way to really deliver for us and for the homeowners.
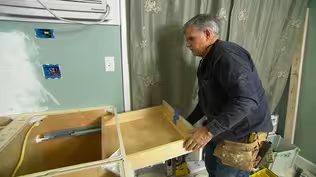
Kevin: So, I'm told our three houses down in Swannanoa, they all have hardwood floors down.
They've got primer up on the walls.
And today we might even start hanging some kitchen cabinets.
Richard: Yeah.
Down at Paula's, the windows and floors are in too.
But today we're actually going to be doing air sealing.
It's a technology that is really cool where you can seal up a building, even existing buildings.
I'm really excited about the technology.
Very cool.
Let's turn up -- Turn up the music.
-Roll your window down.
-Kevin: Oh, is this the music?
This is it.
Kevin: Ah!
Cicada FM.
Richard: Oh, geez, I don't know.
[ Cicadas chirping ] Kevin: A lot of activity down here.
Mostly renovations, but a couple new builds for houses that were taken down, concrete truck pouring a footer for a foundation, and three of our projects well underway thanks to the help of Balsam Built and some volunteers who have been here from the very beginning.
So on the outside, you can see siding and trim is up and on the inside, board is up, floors are down, which means we can start focusing on interior trim and cabinets.
Thank you all.
We appreciate you.
Hey, Chris, Noah, good to see you guys.
Chris: What's up, Kevin?
How's it going?
Kevin: All right.
Going all right.
Looks like you guys already got started here.
Chris: Yep.
Caught us right in the middle.
Kevin: Very nice.
I'll let you get that clamped, but maybe you guys can give me a ladle in on what we're going to get doing here.
Chris: Definitely.
Kevin: So we got first two uppers in, right?
Chris: Yep.
-Kevin: May I pull it down?
-Chris: Sure.
Yeah, we can take a quick peek at it.
Kevin: What's what?
Chris: So basically, we got this wall here and then this wall here.
Kevin: Okay.
Chris: And it's just kind of like an L-shaped kitchen.
So we'll go from the fridge over there to a range to a corner to a sink.
Kevin: And then Maya's called for an island in the middle, I presume, with two bases and an overhang.
-Chris: Small island there.
-Kevin: All right.
So you guys measure up, and you like setting cleats right here so that you can rest the cabinets on it.
So you got these in already.
Why did you guys start in this corner?
Noah: This outside wall is a little out of plumb, and we're working wall to wall with cabinets, so.
Kevin: Start with the hardest, right?
-Chris: Yeah.
-Kevin: Okay.
And start with the uppers, lowers?
You guys adamant about that methodology or what?
No, I think it just depends on the situation.
I think the wall-to-wall program and a couple fills is why we chose to start at the top.
But, you know, down the street we did the lowers first so we can template for cabinets or countertops.
Kevin: Countertops.
Right.
Okay.
Well, let's get to it.
-Chris: Yeah.
-Kevin: All right.
Let's get I guess that one.
I'll go grab -- I'll look at the plan and look what's coming in next.
Chris: How are we looking?
Noah: Could use a shim up top.
Kevin: I think this is the next one, 21 incher.
Just push it right up abut to the corner?
Noah: No, let's hold on a sec for that.
Maya's chosen a retro sort of 40-inch range.
-Chris: It's very Maya.
-Noah: Yeah, totally.
Throughout the house.
And since we're using stock cabinets, we need to make up for a 2-inch difference.
-Kevin: This is 40.
Stock is 42.
-Noah: Correct.
Kevin: So we're going to have a little bit of this and that way.
Noah: Exactly.
So to keep that -- To keep that centered, we're going to go ahead and pull the 48.
To get to our range, we're going to shoot a laser and then bump off of that and measure for our filler to make sure that this upper ends up within one inch of the lowers.
-Kevin: I gotcha.
Okay.
Well, use stock when we can.
Let's do it.
Chris: Mark an inch in.
Then we're gonna go ahead and just measure from there to there to double check our measurements.
Noah: Looks like 23 1/8 light.
Kevin: And filler will make up the difference.
-Noah: That's right.
-Kevin: Okay.
♪ Like that?
Where do you guys want me to pilot this?
Chris: These are the uppers.
And you're kind of looking up at them.
We like to hide the countersink.
We're going to pilot above hinge that I took off the door.
♪ ♪ ♪ ♪ ♪ ♪ ♪ ♪ Chris: All right, we're gonna go ahead and set our cabinet elevations now.
And we predetermined this as our high spot.
So we're going to go ahead and use that tick.
Kevin: High spot and also represents top of our base cabinet.
-Chris: That's right.
-Kevin: Okay.
Chris: And so instead of -- If you notice, the laser is high right now.
That's purposeful.
So instead of trying to line the laser up on all of the tops of the cabinets, you kind of lose it sometimes.
We'll use a stick and bring the stick down to our tick and set it right there, and then we'll actually mark the laser on the stick.
And then when we're going around and setting cabinets, we just have to set this on the top of it.
Kevin: Yeah.
Chris: And the laser's there versus planed out.
-Kevin: And can we set this guy?
-Chris: Yep.
Let's do it.
♪ All right, so we're a little low, so about a quarter.
Yep.
Kevin: That is a handy trick, huh?
♪ Chris: Yeah, we're good.
We don't need anything back there.
Kevin: Nice.
♪ ♪ ♪ ♪ Kevin: Look at that, huh?
Two piece.
You get around the plumbing back there?
Chris: Yep.
Getting there.
There we go.
Kevin: Yeah, you did.
-Okay.
-Chris: Perfect.
Kevin: Noah, let me just slip this in there, see what we're going to look like.
So we've got sort of a pedestal kitchen sink going in basically.
-Right?
-Chris: Yep.
It's kind of a free-standing sink.
Kevin: Yeah.
So once we set these, fix the space, you guys can send that home?
Chris: Yeah, so we'll get that space designated and then we'll level this up and be on our way.
Kevin: So Maya's got a two-base cabinet island right here, and then she's pretty much all set with this kitchen.
-Chris: Yeah.
-Kevin: She's gonna be thrilled tonight when she comes home.
-Chris: She's gonna love it tonight.
Big improvement for the day.
Kevin: All right.
Nice job, guys.
Let's get this in.
Chris: Great.
♪ Jenn: It's springtime here in Asheville, and things are starting to bloom.
People are starting to come back into town, but there's still a lot of work to be done at our project houses.
And today, here we're at Matt and Melinda's, and Matt is here to help us talk about the trees.
Matt: Hey, Jenn.
Thank you for having us here today.
Jenn: Yeah, absolutely.
So what we have here today is this is Melinda and Matt.
This is a program in Buncombe County.
It's where 4,000 residents have signed up throughout the county.
And this program is specific to residents that don't have the wherewithal to get the debris, the hazardous trees, the stumps, the things that are on their house, get that actually out to the street.
And so what this program does, through FEMA and through the federal government, allows us to come on and get these trees that are hazardous, that are either leaning or uprooted.
There's large stumps, as you can see behind us here, and remove those hazards and get them out of the way, otherwise it'll never get done.
Jenn: So you come in with your crew, you determine what trees are leaning, what's unsafe, what's going to go down in the next storm, and then remove them.
-Matt: Yep.
Jenn: All right.
How much wood, how many trees do you think came down?
Matt: Glad you asked that.
Just to give you an idea of the magnitude of this disaster, in the last seven months, we've removed over 2 million cubic yards of debris.
Jenn: That's remarkable.
Matt: To give you a visual, that'll take an NFL stadium and fill it up like a soup bowl of unprocessed debris.
-Jenn: Yeah.
-Matt: Give you an idea.
Jenn: That's incredible.
That is a very important thing that you've done for all these people.
Thanks for your effort in coming in here.
Once all of this debris is cleared out, we might use a few logs for the landscape plan, but then we can get moving on that.
Matt: Sounds great.
Jenn: All right.
Thanks for coming out.
-Matt: Thank you so much.
-Jenn: All right.
Take care.
-Hey, Melinda.
-Melinda: Hey.
How's it going?
-Jenn: Good to see you.
-Melinda: Good to see you.
Jenn: Well, this is quite different from last time.
Melinda: Yes, it really is.
We've made a lot of progress.
Jenn: No trees hanging through the roof now.
Melinda: Right.
If you remember, there were six trees on our roof, and one had come through this side of the house and opened up the roof here.
But we've got a more open floor plan and have made some progress on that, so we're excited for the changes.
Jenn: I mean, it's quite a difference.
And you've gained all this space.
Melinda: Yes.
So if you remember, there was a wall here that separated the two rooms that stopped at around this area.
So we've decided to make this a peninsula type of counter.
There will be four stools where we can all sit and eat dinner.
Jenn: And this is where all the magic conversations are going to happen.
-Melinda: Right.
Yeah.
Jenn: So how are you guys doing?
Melinda: We're doing okay.
You know, it's been six months since the storm, and the kids are still terrified.
When it rains, they cry, and when the wind blows or there's a storm, they're just, you know, still really scared.
And we are too.
Time will help things.
But as of right now, we all still have a little bit of post-traumatic stress.
Jenn: You lived through quite a bit, so I'm glad the disaster relief company was able to come in and determine what trees needed to come down, are compromised.
Melinda: Yes.
We appreciate all the help that they did in the area and in our yard, just so that we would feel safe as our -- you know, for our family to move back in here.
Jenn: Right.
I think it needed to happen.
-So.
-Melinda: Yeah.
For our peace of mind.
You know, I hope that we can all feel safe when we move back in.
Jenn: Well, I spoke with your landscape architect earlier, and she's got a lot of great ideas.
It's going to be a more naturalized plan just to get it back to feeling like home.
Melinda: Yeah.
Better than before.
Jenn: Yeah.
It's going to be great.
Melinda: Great.
See you later.
Jenn: Yeah.
We'll see you later.
Melinda: All right.
♪ Mark: Wow.
All right.
Thank you, Charles.
-Isabel: Hello.
-Mark: Hello, Isabel.
-Isabel: Welcome.
-Mark: How are you?
-Isabel: Good.
How are you?
-Mark: I'm doing great.
Thank you for having me.
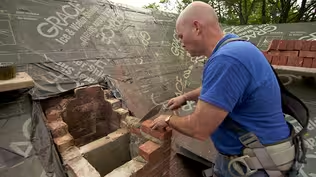
And in my world, this is a masonry project extraordinaire.
I don't even know where to start, but maybe you can help me.
Isabel: I understand that completely.
It is a beautiful inn that we are looking at here.
The Grove Park Inn was built starting in 1912, the project kicked off, and over 400 men worked on the construction of the inn.
They worked for 11 months and 27 days.
Mark: I know the stone is indigenous to this area, but how did they actually get it in place?
I mean, this looks like a lot of work.
Isabel: Oh, definitely.
Great question.
So the stone is locally sourced.
It was unearthed from Sunset Mountain, which is what we're standing on right now.
Mark: All right.
So again, uniqueness all over the place.
I mean, these lintels, those just look like natural cut stones that kind of fell out of the mountainside.
Massive undertaking.
And the results are just stunning.
I mean, really just blown away by the place.
Isabel: They only had ropes.
They had mules and wagons.
They had one steam shovel.
They didn't have the modern-day tools that we have today.
Mark: Simply amazing.
So more of the same inside?
Isabel: Yes.
You want to come take a look?
Mark: I would love it.
Isabel: Welcome to the great hall of the main inn.
This is the portion of the building that was built in 1913.
Mark: Amazing.
Isabel: It is a beautiful structure in here, and it is flanked by our twin fireplaces that are 36 feet wide and almost two stories tall.
Mark: Wow.
Amazing.
So, Isabel, I have to admit, I'm like a kid in a candy store right now.
Do you mind if I give myself a self tour?
-Isabel: Please geek out.
-Mark: All right.
Thank you.
-I'm going to start over here.
-Isabel: All right.
Mark: All right, so this is the most amazing fireplace that I've ever seen.
Right off the bat, look at the size of this boulder.
Good stonemasons always put the biggest stones at the bottom.
Not so indicative of this fireplace because look at this.
I don't even know if this is three tons or four tons or whatever, but I know how they got it in.
It was a pulley, a couple donkeys, and a rope.
So pretty amazing.
But as I get deeper into this fireplace -- I'm going in.
I want to see the mechanics.
So here we are on the inside of the fireplace.
I'm looking at the Ben Franklin perfection right here.
You can see that we're wide at the bottom, and as we climb up to the top of the smoke chamber, we cone into the flue chamber.
And that's why this fireplace looks perfect.
And on my way out, I cannot ignore these andirons.
Look at the dimples.
All the patina.
I mean, this is custom made, but you wouldn't pick this up anywhere else but a welder shop.
But you got to come around the corner, and I want to show you something.
Look at this.
This is the original elevator from 1913.
And anytime I want to go upstairs, all I do is press a button.
Okay, at first glance, these stones are put in kind of a mismatch, but I know it's structurally sound.
Why?
They have the big stones at the base.
This wall is actually 5 or 6 feet deep, so it's a very strong wall.
The reason I know that skilled masons were on this project is look at these grout lines.
You can see that there's never one straight.
Everything is at an angle.
It goes side to side and it follows each stone.
So that means there were good stonemasons on this job.
And as I get closer to this mechanism right here, this is the gong.
I can't ignore it.
[ Gong rings ] When everybody on the inside hears that sound, they come outside and look at what they see.
Sunset in Asheville.
♪ Richard: A house is made up of a series of components.
There's walls, there's floors, there's ceilings, there's roofs, there's doors, and there's windows.
And every time we bring those components together, mechanically, we connect them, you can get air leakage right here that can come out through this small crack.
And it's a surprisingly large amount of air.
Now, around windows you can caulk them when you put them in.
Around doors so too.
But it's in the quiet places you don't think about where the floors and ceilings meet where a lot of infiltration and exfiltration, air leakage, can happen.
So today we're going to show an interesting product that can seal up any building, whether or not it's under construction like this or an existing building.
Abe, I'm so excited you're here with all of this cool stuff.
Why don't you take us through the process?
Abe: Thank you, Richard.
I'm really excited to show you.
So today, the first thing I want to show you is the heart of our system.
This is our sealant.
This is a caulk.
And how it differs is we're able to aerosolize it.
Richard: Aerosolize, so it can become a fine mist.
Abe: Become a fine mist.
And what we'll do is we'll pump it through our system and it sprays through our nozzles here.
Richard: Nozzle right here.
Abe: We'll have four of these stations right around the space.
And so that sealant needs a way to find the cracks.
And so how we're going to do that is we're going to use our blower door... Richard: Just to pressurize and push it all into all the cracks, right?
-Abe: Exactly right.
-Richard: I love this.
All right.
So we got to start with sort of a baseline though.
We got to find out how leaky this house is to start, right?
Abe: Right, and so this system, what it's going to do is perform an initial test.
And my teammate Caleb here, he's going to help us set up the blower door.
Richard: Perfect.
Abe: And we're going to get a reading on where the house is starting and how leaky it is.
Richard: I'll bet you it's plenty leaky.
♪ For the blower door test, a large fan is mounted to the door frame, pushing air into the building to determine the speed and the amount of air that escapes through the gaps and cracks.
♪ All right.
So what do we got for numbers?
Caleb: So we got about 2,100 cubic feet per minute of air leakage inside the envelope right now.
Richard: 2,100 cubic feet every minute.
And how much pressure are you pushing into the building?
Caleb: So we're pushing in about 100 pascals of air, which is equivalent to about 30 miles an hour's worth of wind.
Richard: So 30 mile an hour wind is pushing on every single seam, and that's making it -- and 2,000 CFM is still leaking through there.
-That's a lot.
-Abe: Exactly.
Yeah, yeah.
And here's a little visual.
If we could just pretend maybe this were a cubic block of air.
Richard: Well, that's a really good visual, because people don't understand just how much leaks through here.
Abe: 2,000 of these escaping.
Richard: And we think that the building is so tight, you know?
Abe: Right.
Richard: And what are we shooting for to get to?
Caleb: We're shooting for about 500 cubic feet per minute of air leakage.
Richard: Well, let's go.
Let's get those misters going.
Caleb: Let's get it started.
♪ Richard: As the blower door runs, the nozzles inside the house spray a fine mist that gets pushed into the tiny gaps and cracks of the building.
The mist hardens in place, creating a caulk-like seal that stops air from leaking.
While the space must stay clear during application, the seal is nontoxic once cured.
♪ ♪ All right, so it's been about an hour.
How'd we do on our test?
Caleb: Yeah, so if you look right here, we started at 2,181 CFM, and we finished out at 484.
Richard: So even less than 500.
That's extra credit.
-Good job.
-Caleb: Awesome.
Richard: This house will be comfortable for the next hundred years.
-Abe: That's right.
Yep.
-Richard: Thanks, boys.
With a little help from the local wholesaler, we've added some important components.
One is fresh air -- energy recovery ventilator, fresh air in, exhaust air out in a controlled way.
And a couple of air conditioning condensers for heating and cooling right here.
Heat pumps.
So we have separate systems on the top and bottom floors.
So we've given a little chance for the air to clear in here.
So now we can see the effects of this system.
Here's an electrical outlet box right here.
If you look carefully, you see it's completely sealed all the way around.
No more air leakage here.
And electrical wire, you can see the coagulation behind here.
This building is now sealed.
And that completes our work for right now from here in Asheville.
But we'll be back to keep all of these projects moving to the finish line.
So until next time, I'm Rich Trethewey for "This Old House."
♪ Kevin: Next time on "This Old House," here in Yancey County, they've got a lot of rebuilding to do.
It turns out there's a group of high-school students who are stepping up to do just that.
Young Man: Honestly, this is truly something unique, like a little heart of gold in this school.
Tom: This is a great antique chest that you're going to turn into a vanity.
I love it, and it's going to take a little bit of work because we have a sink that sits in the middle.
Woman: Right.
Kevin: And I'm about to help Noah install some window trim.
That's next time.


- Home and How To

Hit the road in a classic car for a tour through Great Britain with two antiques experts.


Support for PBS provided by:
Funding for THIS OLD HOUSE is provided by The Home Depot and Renewal By Andersen.